


Popular Posts
-
 Hello and Happy Wednesday! In my last blog post I made my first outfit pic, which was a bit tricky, but as promised, I managed to find ...
 -
 Tell me what you think!!!(‐^▽^‐) I'm very curious to know your opinion about the "Hime Cut" mommy made for me!...
 -
 Dont worry. Im wearing a wig. uguu. (◕‿◕✿) Ugh!! Already October and it got even warmer here on Tenerife...! Autumn isnt autumn wit...
 -
 New nail polish, huhu ^^ Awww, everything looks better on long nails but it can be really so hard to let them grow out.... And th...
 -
 Heyaaaa! Intake & Exercise for Day 3 of my 100 day clean eating challenge! - Breakfast- - Rosehip tea - 2 scrambled eggs ...
 -
Heya! Can you remember it? Can you remember my old, boring blog design? Well I certainly don't because the NEW, bouncy, paste...
-
Reading the title, you might think now, what the heck is this challenge that I want to put myself under for 100 days and WHY!? Well,...
-
 HELLOW EVERYONE AND.... H A P P Y E A S T E R ! ! ! Or should I say Happy Easter Tea Time?! ; D Because yesterday ❤ MOM...
 -
 Hooohooo, hello every ♥ Remember my blog post about that Super Barbie Pink nail polish? Oh well yeah, so I told you that I bought it ...
 -
 Helloooo! It's Friday evening here in London! Today, I recorded a video. It a secret! I can't tell you more than "tuto...
Showing posts with label tutorial. Show all posts
Showing posts with label tutorial. Show all posts
Tuesday, October 1, 2013
MAKE A CAT EAR HEADBAND IN 1MIN!
Monday, January 7, 2013
CUTIFY #2 Happy Memory Jar
Hey guys!
The first week of 2013 has passed - have you already started to realize your New Year's resolution (if you made any), do you just feel brand new or do you think that the 1st of 2013 didn't make any difference?
I personally that the 1st day of the New Year was very different, everything felt brand new! : D
Whatever it may be, 2013 is definitely a new start and a lot of things will happen, hopefully a lot of good things! Though, as the year passes by we forget all the good things that happened (or if you're retarded like me you're forgetting stuff within a day XD) and that's why we gotta save these memories somewhere, for example, in a
♥ HAPPY MEMORY JAR ♥

You make one in January, write all the good things (even just little ones!) that happen on a piece of paper and put it in the jar. In December, you can empty the jar and read all the notes, so you remember how fun and a-some 2013 was! : D

This, what you see here is just an ordinary jar where once pickled veggies were stored in.

The jar also has a fitting lid, which obviously doesn't look very cute...
But, I'm gonna change that!
Let's get ready to....
◕ ◡ ◕ CUTIFY! ◕ ◡ ◕

To make this boring jar look dollicious, I've gathered some stuff I have at home, which will deifinetly help to doll this jar up!
- Adhesive foil with a cute flower pattern
- Adhesive gems
- Some ribbon bands

I'm going to wrap part of the jar in the decorative, adhesive foil to make it look less "naked".
For this step I simply roll it from the point I want the jar to be covered in foil.

Like this ↑

Then, I mark the point where I'm going to stick both ends together.

I take the jar off the foil to measure and connect the marked points.

Then, I simply cut along these lines.
When cut out, I take off the back foil and stick it over a normal A4 sheet. I do this because the foil alone would be too thin to stick it nice and even on the jar.

And por fin it looks like this ↑

Alright, these are double-faced adhesive tape squares, which are actually intended to be used for photos to be stuck in photo albums! But this time, I'll use it to stick on the decorative foil ; D


Like this ↑

And voilà, that boring jar looks already much nicer!
But, what about that unpretty looking jar lid? : O


See what I did there?
I just put the lid under the foil, draw around the top edge circle, cut the foil out out, paste it on paper and stick it on the jar lid. Then, I also decorated it with adhesive pearls to even out the border and make it look less plain! : D

Now, similar to what I did with the pearls, I'm going to even out the borders of the foil on the jar.
For this step I take a ribbon band, measure how long it should be to reach around the jar and stick the ends together.

Tadaaa! : D

Here you can see that I also tied a shiny, golden ribbon around the neck of the jar.

Now you can put your happy memory jar wherever you want, mine is right next to my bed! : D
You can get some note papers ready and put it next to the jar too. Whenever something good happens, write it down and put it in the jar!

I wrap my lucky New Year's penny in the note paper (yes the back side of the violet paper is white lol confuzzle) and hold it together with a cute, baby pink thread!
I hope you have fun and maybe even need a bigger jar, haha! ♥
Sweet Greetings and a happy New Year!
Venus
♥ FANGELICS WHO GOT INSPIRED TO MAKE A HAPPY MEMORY JAR TOO ♥

By @SosaSoska on Twitter

By @NeveAkram


By @noxiousgum on Twitter

By @HappyOliveHappy on Twitter!
If you want your pic to be featured too just let me know at venusangelic@gmail.com or on Twitter @VenusAngelic : D
Wednesday, December 19, 2012
Venus’ Anti Ageing Advice
Here is my top ten of anti ageing advice! Anti ageing care doesn't start when you see your first wrinkles or it doesn't mean you're obsessed with your outer appearance. Skin care doesn't only limit to your facial skin, like, we have skin all over our body which can get wrinkly too! (´◕ω◕`)
Here are the 10 most important points about preventing premature ageing and keeping healthy!

1.- Massage your face, but don’t drag your skin down or pull too hard. Look at my “Small Face Workout” which is that kind of massage they do in Japan against aging.
Here are the 10 most important points about preventing premature ageing and keeping healthy!

2.- Drink lots and lots of water, at least 8 cups a day!
3.- Sweat, exercise! The best exercise in this case would be cardio; it raises your heart rate which increases your blood flow and transports oxygen to your skin ALSO the sweat is gonna clean your pores (and overall, it helps you to stay fit! ^^).
4.- Eat healthy, keep in mind the “ACE” vitamins;
Vitamin A (Antioxidants, super important! Growth and renewal of skin cells) => Egg yolks, dairy, dark leafy greens, carrots, liver, etc!
Vitamin C (For collagen; Structure, tone and elasticity of your skin) => Citrus fruits, broccoli, berries, tomatoes, peppers, strawberries, etc.
Vitamin E (it’s to keep the “skin tissue” healthy) => Leafy greens, nuts, whole grains, peppers, sunflower seeds, avocado, peanut butter (yum, haha!)
※ Eat sweets, crisps and fast food in moderation, they’re not good for your skin!
※ If you fail to take enough vitamins daily, consider taking vitamin pills, though taking the vitamins through food is better, so just eat enough and healthy! ^^
※ Just because you ate healthy for one day, your skin will not have drastic and visible changes. Your body needs 2 to 3 months to adjust to the new healthy food and your skin cells to regenerate!
5.- Avoid sun to skin exposure, if, then use a sunscreen with a SPF of at least 15 and 30 in the summer.
6.- DON’T SMOKE
7.- Relax! Stress isn’t good for your skin. Whatever helps you with handling stress, like, drawing, bubble bathing, listening to music…do it!
8.- SLEEP! While sleeping your body cells are reparing and regenerating. Sleep at least 8 hours <3 If you have trouble sleeping, build a blanket fort, it helped me, now I sleep like a baby! : D
9.- Use moisturiser! One in the morning, and moisturiser for over night. You can find day and night moisturisers at drug stores.
10.- NEVER ever go to sleep with make up on! Always use make up remover. After waking up, make sure to wash your face with cold water.
It doesn’t only refresh your skin but also wake up your head! : D
It doesn’t only refresh your skin but also wake up your head! : D
ʕ ·ᴥ·ʔ GOOD LUCK! ʕ·ᴥ· ʔ
Friday, October 26, 2012
Kawaii Halloween Costume: The Solution!
Hello my
love colored scrabble dabble gummi bears!

Wow, it's almost Halloween, the creepiest time of the year and I didn't give you a spooky pet name?
Nah, whatev' *whips hair*
Wait until you see my super spooky Halloween ghost story I'll post sooooooon! boooooooo!

Ok. Let's move on...↓↓↓↓↓
Do you want to look really kawaii á la Venus Angelic on Halloween?
If you don't, then I suggest you should.
Here are all my tutorials which are just prefect for a Halloween party, Trick Or Treat...whatever you may do on Halloween, it's a norm to dress up, if more or less, creepy! ✧*。ヾ(。・ω・。)ノ゙✧*。
■♥KITTY♥■
◊♣◊PUPPY◊♣◊
♦●●●♂BOY♂●●●♦
✧(๑✪д✪)۶UNICORN٩(✪д✪๑)✧
✧✮SAILOR MOON✮✧
♬♩♫♪☻ANIMEEYES☺♪♫♩♬
✖✖☢✖REDRUM DOLL✖☢✖✖
Friday, August 31, 2012
HOW TO CUTIFY! #1 Strawberry Basket
Hello my crafty pepperonis!

If you saw my new video about how to cutify your boring notebook, then you already know that I got really crafty recently!

Well, I always loved crafting since I was a little kiddie, lol!
See this basket made by 10-year-old-Venus! ♥
I‘m still using this basket for storing pens, pencils, erasers, etc. on my desk. ^^
But I thought that this basket needs a bit more "pop"!
★So I‘m showing you how I cutified this basket in less than 5 minutes!★

That‘s what I used: A pink band from a sewing supply store, and a strawberry motive which once fell of from a hair band!


The basket has opening, in which I'm looping the band trough. ♥


When I finished looping trough all openings, it looked like this ↑

Then I tie one ribbon...
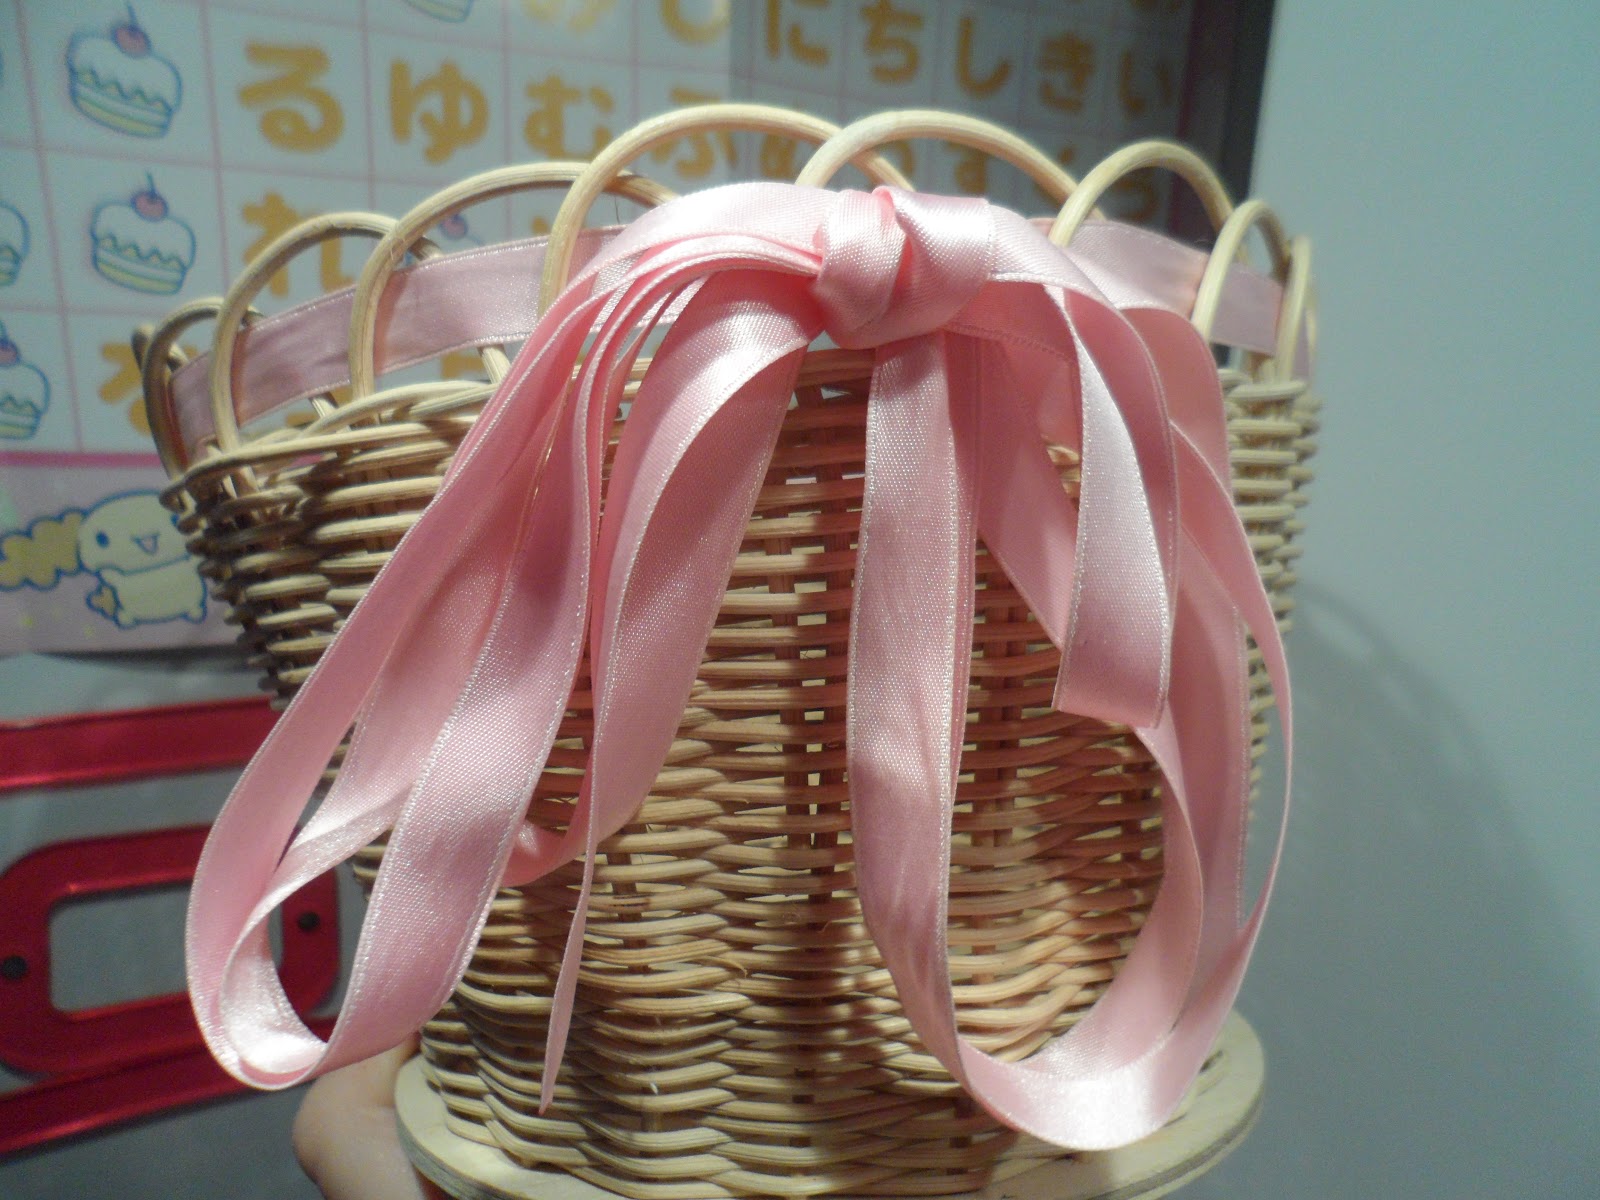
And out of the first ribbon I'm creating another one!
Double Ribbon!


Luckily I was able to use normal all purpose glue for the strawberry, It still holds, yippie! ٩꒰⍢ ꒱۶

Just press it for a few minutes, to make sure it REALLY holds, otherwise it might fall of in the middle of the night and you have to call a monster hunter because you read too much scary stuff, lol!
Annnd voila! It's already cutified, in less than 5 minutes!
In less then 5 minutes, have some fun and a cuter desk! (Oh, and of course I also reused the strawberry from the broken hair band, it would be such a waste to throw it away!)
I hope that this little blog entry inspires you to discover more ways of cutifying things!
Hope you have fun, and expect more crafty ideas from Venus‘s laboratory! ; D
Sweet Greetings♡
Venus
Thursday, August 9, 2012
小顔 - Small Face
Hey Guys!
This, is not just a new video, it's my 100th video! Yaaaaay!
And because it's my 100th video, and because so many people requested it, I decided to upload this video where I have no makeup and no circle lenses on . I‘m so happy you like it!

Thank you! ( ❝̆ ·̫̮ ❝̆ )✧
In the comments I saw that there are still so many open questions to this video!
And because YouTube has character limits in the comments, I'll dedicate a whole blog post for your questions! <333
Let's investigate! What is the idea of this video? What is a small face?
◆◇◆◇◆◇◆◇◆◇◆◇◆◇◆◇◆◇◆◇◆◇◆◇◆◇◆◇◆◇◆◇◆◇◆◇◆◇◆◇
※ 小 → ko → small
※ 顔 → gao → face
* When talking japanese you say "kao", but combined with "ko" the k softens to a g.
Many of you guys think, that when I say "Let's make our face smaller and prettier with massage" you think "But it's not possible to distort our bones lol".
No way! Did I ever mention BONES in my video? haha
It's all about your skin! To make this process easier I'll show you my favourite pic that explains what Kogao is all about!
 |
| This. (̿▀̿ ̿Ĺ̯̿̿▀̿ ̿)̄☝ |
See? I think now you understand! Gravitation sucks our skin down to earth causing wrinkles and sagginess. But by doing some exercises you prevent it from constantly being "pulled". That's why grandmother has got more wrinkles than you! Because she spent more time living on earth, her skin has experienced much more gravitation than yours.
When you stay in water for 30 minutes, you can feel the gravitation literally pulling you down to the ground. You just don't feel the strength of gravitation all the time because you're used to it!
So I hope this helped you if you didn't see the purpose in my face exercises♥
Sweet Greetings
Venus
* Credits for the image go to http://www.clp.co.jp/
Wednesday, March 14, 2012
What I do when I can't decide between crazy and just plain simple!
Hello and Happy Wednesday!
In my last blog post I made my first outfit pic, which was a bit tricky, but as promised, I managed to find out how to make outfit pics (that aren't blurry or the camera covering my face and I can't even see and stuff huh).
Ohhh, and I also told you that I went to Oxford Circus, but I didn't tell you what I did there. But I'm sure I told you that I'm gonna tell you today what I did there, and I'm gonna do it RIGHT NOW!
SO the reason why I went to crowdy Oxford Circus is because I had to buy 3 pieces of a certain white blouse.
WHY???
Because...
It's not just a white blouse.
It's a SIMPLE white blouse.
SOOOOO freakin' simple that you can wear it whatev' ya want with it!
Spring is here, wear the white blouse!!!
Summer comes, wear the white blouse (and al gusto pull the sleeves up to make yourself look super chillin')
"After summer follows autumn, in that golden time the maidens shall wear the white blouse with a frilly ribbon jacket.", said mother nature.
And in winter pull over a fluffy jersey over the white blouse and to nerdify the look wear big glasses (you know those big glasses that kawaii girls wear and then make the duck mouth?? exactly those glasses. nerdy glasses. huhu.)
After all that cool stuff I just said I finally show you my outfit pics (ATTENTION: white blouse!!)
WHITE BLOUSE + SPRING COORDINATE

Outfit Index:
- White blouse combined with pink frilly pants.
- Because those are high-waist pants, I tucked the blouse in, but because the frill isn't too dominant, it's also cute when the blouse hangs over the pants.
- I use white lace tights instead of socks to create a balance between different colours and body proportion.

Outfit Index:
- Because both the blouse and the overall's colours are neutral, I wear a red ribbon. Red is a more dominant colour and gives the outfit a feeling. Without anything colourful on my head the outfit would be a bit cold, right?

Outfit Index:
- First and most important thing: I tried to imitate a pop art look. lol.
- As you see it consists of only black and white. But white is dominant. I don't like black as the dominant colour because it makes me look even MORE pale (in a bad way, i mean, haha XD)
- Also a pro of this outfit is that it looks classy, but you are still able to move awkwardly (see pic bottom right, lol XD) thanks to this handy white blouse and the skirt's nylon belt! haha.

I know, this isn't a complete outfit, but did you know that another pro of that simple white blouse is, that you can wear like numerous super interesting necklaces, without weird looks of people, that you would mostly get when wearing them with lolita clothes or japanese street style. haha. But with a white blouse some crazier accesories are OK if you're just doing normal stuff.
haha and lol. : )
So why a white blouse really is that important:
Because you can combine it with outstanding items, and still look "everday cute".
1+1-1=1
Simple as that.

Have a nice day! CHUUU!
Subscribe to:
Posts (Atom)